Some useful articles for nodeJS, Express, Angular and MongoDb

I was reading some blog post over the last weekend and found some good article on NodeJS, Express, Angular (not angular2) and MongoDB. I think it could be helpful for others:

All this articles are published on http://adrianmejia.com/ site.

Create Node Server with Express & MongoDB [part-2]

If you miss the previous post, you can check it from here Create Node Server with Express & MongoDB

Step 5: Verify mongodb connection with a new collection (Save & Find)

Lets create a db model file under app/models. Lets called the file name bear.js and put the following content into the file:

var mongoose = require('mongoose'),
    Schema = mongoose.Schema;

var BearSchema = new Schema({
    name : String
});

module.exports = mongoose.model('Bear', BearSchema);

To use this model, we need to include it into the server.js file. But our purpose is to save some data into mongodb server and query the content. For that we need to define some ROUTE. To do that, let’s create a file called route.js under app/config folder and put the following content into the file:

var express = require('express'),
    Bear = require('../../app/models/bear');

/**
 * To insert data on POST method
 */
router.post('/bears', function (req, res){
    var bear = new Bear();

    bear.name = req.body.name;
    bear.save(function (err){
        if (err) res.send(err);
        res.json({message: 'Successfully created'});
    });
});

/**
 * To get all data on GET method
 */
router.get('/bears', function(req, res) {
    Bear.find(function(err, bears){
        if (err) res.send(err);
        res.json(bears);
    });
});


module.exports = router;

Now to access the url, we need to include the route.js file in server.js file in the following way:

.......................................
router = require('./app/config/route'),
.......................................

again, to maintain better REST url, we add a prefix ‘api’ to each route for the app. To do that add the following line:

............................
app.use('/api', router)
............................

Now you can access the url like this:

//To Save data
POST http://localhost:8080/api/bears

//To get all data
GET http://localhost:8080/api/bears

Lets try to access the url using postman chrome extension:

First add a data with POST url:

screen-shot-2016-10-16-at-8-52-22-pm

Now get the data using GET url:

screen-shot-2016-10-16-at-8-52-43-pm

Create Node Server with Express & MongoDB

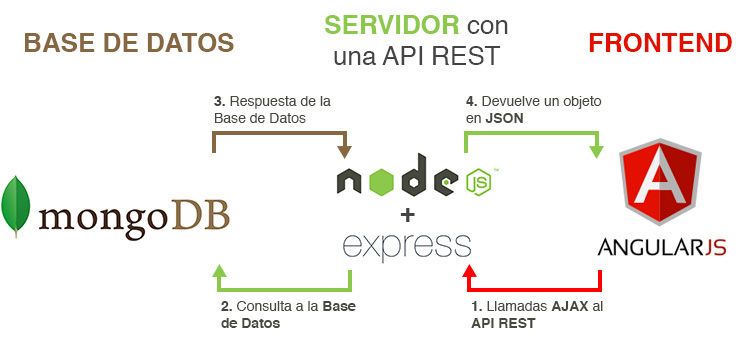
This tutorial will describe how to create a node server with Express Framework and MongoDB database. To start, let take a look at the prerequisite

  • NPM – node package manager
  • MongoDB

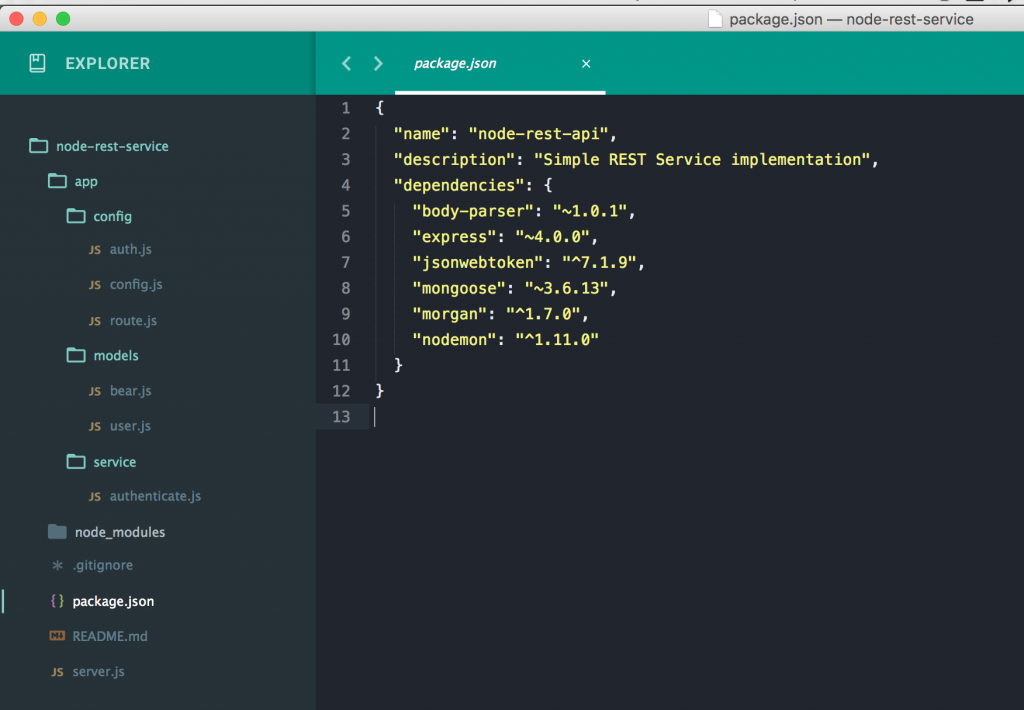
Step 01: Create a folder called “node-tutorial”. Inside the folder create a new file called “package.json”. Add the following contents to the file:

{
  "name": "node-rest-api",
  "description": "Simple REST Service implementation",
  "dependencies": {
    "body-parser": "~1.0.1",
    "express": "~4.0.0",
    "mongoose": "~3.6.13",
    }
}

now run the following command to install the dependencies:

npm install

This will create a local node_modules folder where it will install all the dependencies.

Step 02: Now create some directory in the following format. For now just create the folder, ignore the files inside the folder.

screen-shot-2016-10-15-at-8-39-30-pm

Step 03: create a node server 

Let’s create a node server. To do that, create a file in to the root folder called “server.js”. Put the following contents into file:

var express = require('express'),
    app = express(),
    bodyParser = require('body-parser');

var port = process.env.PORT || 8080;


app.use(bodyParser.urlencoded({extender: true}))
   .use(bodyParser.json())
   .listen(port);
   
console.log('Magic happens on port ', port);

Now execute the following command to run the server

node server.js

You will see the following screen in the terminal:

screen-shot-2016-10-15-at-8-45-59-pm

Congratulations, your first node server is running at port 8080.

Step 04: start mongodb server and connect from NodeJS server

First start the local mongodb Server using the following command

masud-hasan@C02RH1S1G8WM ~> mongod

2016-10-15T00:00:04.089-0400 I CONTROL [initandlisten] MongoDB starting : pid=9862 port=27017 dbpath=/data/db 64-bit host=C02RH1S1G8WM
2016-10-15T00:00:04.089-0400 I CONTROL [initandlisten] db version v3.2.5
2016-10-15T00:00:04.089-0400 I CONTROL [initandlisten] git version: 34e65e5383f7ea1726332cb175b73077ec4a1b02
2016-10-15T00:00:04.089-0400 I CONTROL [initandlisten] OpenSSL version: OpenSSL 1.0.2g 1 Mar 2016

once you run the mongodb sever, it will start on default mongo port at 27017.

Now lets connect it from our app. Create a config.js file under app/config location and put the following content into the file:

var mongoose = require('mongoose');

mongoose.connect("mongodb://localhost:27017/nodetutorial");
module.exports = mongoose;

Here we are connecting to mongodb sever using mongoose module. Here we are creating a new mongodb schema called “nodetutorial”.

To get the mongo connection available through the application, let’s include the file in the server.js file in the following way:

var express = require('express'),
    app = express(),
    bodyParser = require('body-parser');

var mongoose = require('./app/config/config.js'),
    port = process.env.PORT || 8080;


app.use(bodyParser.urlencoded({extender: true}))
   .use(bodyParser.json())
   .listen(port);
   
console.log('Magic happens on port ', port);

Now execute the following command to run the server

node server.js

if you don’t see any error then you are successfully able to connect to the mongodb server from node server.

Step 05: Verify mongodb connection with a new collection (Save & Find)

coming soon…..

MEAN Stack 01: Preapare development enviroment

This is going to be series of article on MEAN stack. Start with setting up development environment with the following the tools

Introduction to Vagrant

Vagrant is computer software that creates and configures virtual development environments. It can be seen as a higher-level wrapper around virtualization software such as VirtualBox, VMware, KVM and Linux Containers (LXC), and around configuration management software such as Ansible, Chef, Salt, and Puppet.

Windows

  • Install Vagrant
  • Create a vagrant script named vagrantfile
    Vagrant.configure("2") do |config|
      
      // this is the box name
      config.vm.box = "ubuntu/trusty64"
      
      // provision script from a separate file
      config.vm.provision :shell, path: "bootstrap.sh"
    
      //forward the apache port to host machine with a  different port
      config.vm.network :forwarded_port, guest: 80, host: 1001
    
      //forward the nodejs port to host machine with a different port
      config.vm.network :forwarded_port, guest: 8001, host: 8001
    
      //share folder between host and guest machine
      config.vm.synced_folder "/Users/vagrant/helloworld", "/vagrant"
    end
  • Run Vagrant Machine with Ubuntu 14.04
    # vagrant up
  • Adding SSH key access to vagrant machine (using PPK file)
    • Install Putty and Putty Gen
    • To generate PPK (Putty Private key), open puttygen
    • Select import private key from the menu
    • show the path of the private key generated by vagrant, default at 
      YOUR_BOX_LOCATION\.vagrant\machines\default\virtualbox\private_key
    • Click the save private key button and save the file in the same location where the default vagrant private key located.
  • SSH to Vagrant Machine (putty, puttygen)
    • Open putty program
    • add the host name in hostbox, default is: 127.0.0.1
    • add the port number, default is: 2222
    • name the settings: testVagrant
    • for authentication, from left sidebar look for auth options and select that. left side you will see the option to browse the path of the PPK file.
    • Now click open and it will ask for login user name. Default user is: vagrant
  • Running the Vagrant from host machine
    • Install Apache Web Server using Ubuntu package manager (APT- Advanced Packaging Tool)
      # Sudo apt-get update
      # sudo apt-get install apache2
    • Forward port from guest machine to host machine using Vagrantfile configuration
  • Setup Vagrant Provisional items
    • Add Apache web server in bootstrap.sh
      #!/usr/bin/env bash
      
      # install apache2 server
      apt-get update
      apt-get install -y apache2
      if ! [ -L /var/www ]; then
        rm -rf /var/www
        ln -fs /vagrant /var/www
      fi
    • Add node package into the server
      # install node package
      apt-get install -y g++
      curl -sL https://deb.nodesource.com/setup_0.12 | sh
      apt-get install -y nodejs
      su vagrant
      mkdir /home/vagrant/node_modules
      cd /var/www/
      ln -s /home/vagrant/node_modules/ node_modules
      npm install karma
    • Create and Run First node.js server
      var http = require('http');
      var server = http.createServer(function (request, response) {
          response.writeHead(200, {"content-Type": "text/plain"});
          response.end("Hello Node World\n");
      });
      
      server.listen(8001);
      console.log('Server running at http://127.0.0.1:8001');
  • Mac
    • Install Vagrant
    • Create a vagrant script

Series:

MEAN Stack 01: Prepare development environment

MEAN Stack 02: mongoDB installation with provision and starting with mongodb

MEAN Stack 03: How to work with mongoDB

MEAN Stack 04: Start with Express framework using nodejs