Test Online REST API using Karma & Jasmine

Today we are going to add test for Online REST API. For that we are using JSONPlaceholder Fake Online REST API.

Let’s start the testing. First of all we are going to write our test for angular.factory called jsonplaceholder.spec.js.

describe('JSON Placeholder API Service', function () {
    var API_ENDPOINT = 'https://jsonplaceholder.typicode.com';

    beforeEach(angular.mock.module('api.jsonplaceholder'));

    beforeEach(inject(function (_JsonPlaceholderApi_, _httpBackend_, _q_){
        JsonPlaceholderApi = _JsonPlaceholderApi_;
        httpBackend = _httpBackend_;
        q = _q_;
    }));

    it(' Should Exists', function (){
        expect(JsonPlaceholderApi).toBeDefined();
    });
});

Now if you run karma start you will see something like that:
screen-shot-2017-11-06-at-11-19-06-am

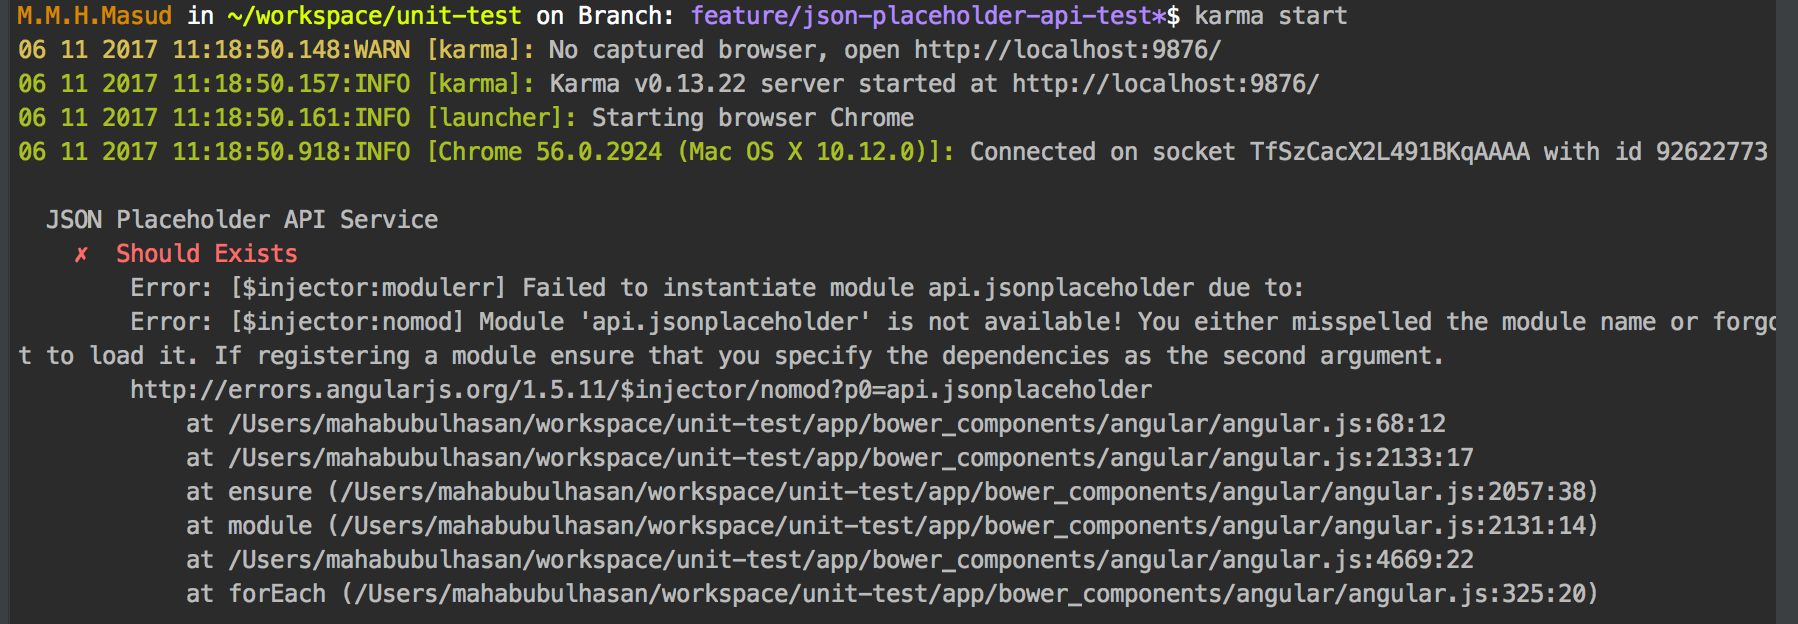
which means, we haven’t defined our angular module with factory. Lets defined that:

(function (){
    'use strict';
    angular.module('api.jsonplaceholder', []).factory('JsonPlaceholderApi', jsonPlaceholderApi);
    jsonPlaceholderApi.inject = ['http', 'q'];

    function jsonPlaceholderApi(http, $q) {
        return this;
    };
}());

This time you will see something like that:
screen-shot-2017-11-06-at-11-21-10-am

Now, lets make a GET call to REST API end point /posts. It will return 100 post item as JSON response. On Success, here we will mock the response with a mockObject which length is 3.

describe('JSON Placeholder API Service', function () {
    var API_ENDPOINT = 'https://jsonplaceholder.typicode.com',
        mockResponse = [
            {
                "userId": 1,
                "id": 1,
                "title": "sunt aut facere repellat provident occaecati excepturi",
                "body": "quia et suscipitnsuscipit recusandae consequuntur expedita"
            },
            {
                "userId": 1,
                "id": 2,
                "title": "qui est esse",
                "body": "est rerum tempore vitae\nsequi sint nihil reprehenderit dolor beatae ea "
            },
            {
                "userId": 1,
                "id": 3,
                "title": "ea molestias quasi exercitationem repellat qui ipsa sit aut",
                "body": "et iusto sed quo iure\nvoluptatem occaecati omnis eligendi "
            }];

    beforeEach(angular.mock.module('api.jsonplaceholder'));

    beforeEach(inject(function (_JsonPlaceholderApi_, _httpBackend_, _q_){
        JsonPlaceholderApi = _JsonPlaceholderApi_;
        httpBackend = _httpBackend_;
        q = _q_;
    }));

    it(' Should Exists', function (){
        expect(JsonPlaceholderApi).toBeDefined();
    });

    describe('GET /Post ', function () {
        var result;

        beforeEach(function () {
            result = {};
            spyOn(JsonPlaceholderApi, 'getAll').and.callThrough();
        });

        it('should return All Posts ', function () {
            httpBackend.whenGET(API_ENDPOINT + '/posts')
                                 .respond(200,q.when(mockResponse));

            expect(JsonPlaceholderApi.getAll).not.toHaveBeenCalled();

            JsonPlaceholderApi.getAll().then(function (response) {
                result = response;
            });

            $httpBackend.flush();
            expect(JsonPlaceholderApi.getAll).toHaveBeenCalled();
            expect(result.length).toEqual(3);
            expect(Object.keys(result[0]).length).toEqual(4);
        });

    });
});

Now, if you run your test you will see an error with getAll method is not defined. Let’s define that method:

(function (){
    'use strict';
    angular.module('api.jsonplaceholder', []).factory('JsonPlaceholderApi', jsonPlaceholderApi);
    jsonPlaceholderApi.inject = ['http', 'q'];

    function jsonPlaceholderApi(http, q) {
        var jsonPlaceholderApi = {},
            API_ENDPOINT = 'https://jsonplaceholder.typicode.com';

        jsonPlaceholderApi.getAll = function () {
            returnhttp.get(API_ENDPOINT + '/posts').then(function (res){
                return res.data;
            });
        };
        return jsonPlaceholderApi;
    };
}());

That’s it. Now you can write as many test as you want.

Test Yourself
– write a test to find an item using following REST API GET /posts/1;

it('should return a POST When called with a valid Id', function (){
    //@TODO: write your test
});

Test angular controller using Karma and Jasmine

In my last blog post, I talked about “Test angular service using Karma and Jasmine”. Today I am going to talk about “Test angular controller using Karma and Jasmine”.

Testing Controller

Lets create a controller test file users.js and do as follows:

describe("UserController", function () {
});

Let’s mock our angular module component.users using angular.mock in the following way:

describe("UserController", function () {
    beforeEach(angular.mock.module('component.users'));
});

To identify the controller users.js we need to add the dependency (inject) to our angular.mock.module in the following way: 

beforeEach(inject(function (_controller_){controller = _controller_;
    UsersController =controller('UsersController', {});
}));

Here we two undefined variable $controller and UsersController. Lets defined them: 

beforeEach(inject(function (_controller_){
    varcontroller, UsersController;
    controller = _controller_;

    UsersController = $controller('UsersController', {});
}));

Now lets start our first test case to check whether the controller is defined or not. To do so, follow this:

describe('UsersController', function () {
    var controller, UsersController, userService;
    beforeEach(angular.mock.module('component.users'));

    beforeEach(inject(function (_controller){
        controller = _controller_;

        UsersController = $controller('UsersController', {});
    }));

    it (' should be defined ', function () {
        expect(UsersController).toBeDefined();
    });
});

Now if we run the following command:

# karma start

it will display error with controller file name. To resolve this error lets create our controller file users.js:

(function (){
    'use strict';

    angular.module('component.users', []).controller('UsersController', usersController);
    usersController.$inject = []

    function usersController() {
        var vm = this;
    }

}());

This time, you will see test case passed:

Chrome 56.0.2924 (Mac OS X 10.12.0): Executed 1 of 1 SUCCESS (0.062 secs / 0.083 secs)
TOTAL: 1 SUCCESS

Testing Controller with Service Dependency

Let’s add the dependency user-service.js (that we created in my last blog post) to the controller and write the test for that.

First modify users.spec.js file as follows:

describe('UsersController', function () {
    var controller, UsersController, userService; // add this

    beforeEach(angular.mock.module('component.users'));
    beforeEach(angular.mock.module('component.users.service')); //add this

    beforeEach(inject(function (_controller_, _UserService_) { // add this
        controller = _controller_;
        userService = _UserService_; // add this

        UsersController = $controller('UsersController', {'UserService': userService}); // add this
    }));

    it (' should be defined ', function () {
        expect(UsersController).toBeDefined();
    });
});

Now if you run # karma start you will see an error, like that

Error: [$injector:unpr] Unknown provider: UserServiceProvider <- UserService <- UsersController

To fix this error, modify users.js controller by adding the service dependency:

(function (){
    'use strict';

    angular.module('component.users', []).controller('UsersController', usersController);
    usersController.$inject = ['UserServic1e']

    function usersController(UserService) {
        var vm = this;
    }
}());

This time you not see any more error.
Now lets define a method userService.all() in service and try to access it in controller users.js.

Update the controller test file users.spec.js file:

describe('UsersController', function () {
    var controller, UsersController, userService;

    beforeEach(angular.mock.module('component.users'));
    beforeEach(angular.mock.module('component.users.service'));

    beforeEach(inject(function (_controller_, _UserService_){
        controller = _controller_;
        userService = _UserService_;

        UsersController = $controller('UsersController', {'UserService': userService});
    }));

    it (' should be defined ', function () {
        expect(UsersController).toBeDefined();
    });

    // add this Test Case
    it('should Initlialized with a call to UserService.all()', function (){
        expect(userService.all).toHaveBeenCalled();
    });
});

This time if you run # karma start, you will see an error like that:

screen-shot-2017-10-30-at-3-48-46-pm

To resolve this error we are going to use spyOn method of Jasmine. Click here to know more about spyOn,

describe('UsersController', function () {
    var controller, UsersController, userService;

    beforeEach(angular.mock.module('component.users'));
    beforeEach(angular.mock.module('component.users.service'));

    beforeEach(inject(function (_controller_, _UserService_){
        controller = _controller_;
        userService = _UserService_;

        spyOn(userService, 'all').and.callFake(function (){
            return [{ id: '1', name: 'Masud', role: 'Developer', location: 'CA', twitter: 'masudiiuc' }];
        });

        UsersController = $controller('UsersController', {'UserService': userService});
    }));

    it (' should be defined ', function () {
        expect(UsersController).toBeDefined();
    });

    it('should Initlialized with a call to UserService.all()', function (){
        expect(userService.all).toHaveBeenCalled();
        expect(userService.all()).toEqual(userList);
    });
});

Now if you run # karma start you will see the following error:
screen-shot-2017-10-30-at-3-57-49-pm

Let’s define the method in our user-service.js file:

(function (){
    'use strict';
    angular.module('component.users.service', []).service('UserService', userService);

    function userService() {
        this.all = all;
        function all(){
            return [{ id: '1', name: 'Masud', role: 'Developer', location: 'CA', twitter: 'masudiiuc' }];
        }
    };
}());

Now if you run # karma start you will not see any error. Now add another Test Case like that:


it('should Initlialized with a call to UserService.all()', function (){ expect(userService.all).toHaveBeenCalled(); expect(userService.all()).toEqual( [{ id: '1', name: 'Masud', role: 'Developer', location: 'CA', twitter: 'masudiiuc' }] ); // add this });

That’s it. Now enjoy Testing your angular application.

Help:
Testing AngularJS with Jasmine and Karma
Jasmine SpyOn

Continue……

If you want to explore my playground, follow this github repository: https://github.com/masudiiuc/angular-unit-test

Create a customizable directive using UI-Select

UI-Select is one of the most popular module for front-end development. it has lots of customizable options, which help to make the UI layer more interactive. So rather than calling the same config thing all the time, why not create a own directive which will accept some params as attribute like field name and config options.

So I create the following directive. here is the way of doing that:

1. Template for the directive, foodropdown.html

2. wirte the directives. fooDropdown.js

3. Syntax of the directive:

4. To test the directive, pass the parameters, in the following way:

Useful NPM Modules for Grunt

Grunt is commonly used as a javascript build tool. Grunt used NPM (node modules) for build purpose. Sometimes it’s very hard to find useful node modules for grunt. Here I will point out some useful node modules that is commonly used with grunt.

This module will clean any directory by removing the whole folders along with the containing files and folders.  The ‘src’ options allow multiple folders with different path.

//clean the build directory
clean: {
    build: {
        src: ['dist']
    }
},
grunt.template.today("yyyy-mm-dd HH-MM-ss-TT") // this will print current date time ex: 2017-01-28 10-10:56 PM
//copy the previous build to
copy: {
    build: {
        cwd: 'dist', 
        src: ['**'],
        dest: 'backup/dist-<%= grunt.template.today("yyyy-mm-dd HH-MM-ss-TT") %>',
        expand: true
    }
},
//rename folders or files
rename: {
    main: {
        files: [
            {
                src: 'backup/dist', 
                dest: 'backup/dist_<%= grunt.template.today("yyyy-mm-dd HH-MM-ss-TT") %>'
            }
        ]
    }
},
//SASS compilar
sass: {
    dist: {
        files: [{
            expand: true,
            cwd: '../css/secondary',
            src: ['**/*.scss'],
            dest: 'dist/sass',
            ext: '.css'
        }]
    }
},
// configure cssmin to minify css files 
cssmin: {
    options: {
        banner: '/*\n <%= pkg.name %> <%= grunt.template.today("yyyy-mm-dd") %> \n*/\n'
    },
    build: {
        files: {
            'dist/css/secondary.min.css': ['../css/secondary/**/*.css','dist/sass/**/*.css']
        }
    }
},
// configure jshint to validate js files 
jshint: {
    options: {
        reporter: require('jshint-stylish'), // use jshint-stylish to make our errors look and read good
        reporterOutput: 'jshint.html'
    },

    // when this task is run, lint the Gruntfile and all js files in src
    build: ['gruntfile.js', '../js/secondary/**/*.js']
},
//compress folders
compress: {
    main: {
        options: {
            archive: 'backup/gmil-<%= grunt.template.today("yyyy-mm-dd HH-MM-ss-TT") %>.zip'
        },
        expand: true,
        cwd: 'dist',
        src: ['**/*'],
        dest: ''
    }
},
// configure to uglify to minify js files based on subfolder.js
uglyfolders: { 
    general: {
        options: {
            src            : '../js/secondary/',
            target         : 'dist/js'
        }
    }
},
// configure uglify to minify js files 
uglify: {
    options: {
        banner: '/*\n <%= pkg.name %> <%= grunt.template.today("yyyy-mm-dd") %> \n*/\n'
    },
    build: {
        files: {
            'dist/js/all.min.js': ['../js/secondary/**/*.js']
        }
    }
},

Finally this is how the package.json file looks like:

{
  "name": "hello-grunt",
  "version": "0.1.0",
  "devDependencies": {
    "grunt": "^1.0.1",
    "grunt-build-number": "^1.0.0",
    "grunt-contrib-cssmin": "latest",
    "grunt-contrib-jshint": "latest",
    "grunt-contrib-less": "latest",
    "grunt-contrib-uglify": "latest",
    "grunt-contrib-watch": "latest",
    "grunt-include-source": "^1.0.0",
    "grunt-ugly-folders": "^0.1.6",
    "jshint-stylish": "latest"
  },
  "main": "gruntfile.js",
  "scripts": {
    "test": "echo \"Error: no test specified\" && exit 1"
  },
  "author": "",
  "license": "ISC",
  "buildnum": "1"
}

This is how the gruntfile.js file will looks like with all this configuration:

module.exports = function (grunt) {

    grunt.initConfig({
        pkg: grunt.file.readJSON('package.json'),

        // configure jshint to validate js files 
        jshint: {
            options: {
                reporter: require('jshint-stylish'), // use jshint-stylish to make our errors look and read good
                reporterOutput: 'jshint.html'
            },

            // when this task is run, lint the Gruntfile and all js files in src
            build: ['gruntfile.js', '../js/secondary/**/*.js']
        },

        // configure uglify to minify js files 
        uglify: {
            options: {
                banner: '/*\n <%= pkg.name %> <%= grunt.template.today("yyyy-mm-dd") %> \n*/\n'
            },
            build: {
                files: {
                    'dist/js/all.min.js': ['../js/secondary/**/*.js']
                }
            }
        }, 

        // configure to uglify to minify js files based on subfolder.js
        uglyfolders: { 
            general: {
                options: {
                    src            : '../js/secondary/',
                    target         : 'dist/js'
                }
            }
        },

        // configure cssmin to minify css files ------------------------------------
        cssmin: {
            options: {
                banner: '/*\n <%= pkg.name %> <%= grunt.template.today("yyyy-mm-dd") %> \n*/\n'
            },
            build: {
                files: {
                    'dist/css/secondary.min.css': '../css/secondary/**/*.css'
                }
            }
        },

        // include source to common.jsp
        includeSource: {
            options: {
                basePath: '',
                baseUrl: '',
                templates: {
                    jsp: {
                        js: '<script src="{filePath}"></script>',
                        css: '<link rel="stylesheet" type="text/css" href="{filePath}" />'
                    }
                }
            },

            myTarget: {
                files: {
                    'dist/common.html' : 'index.tpl.html'
                }
            }
        },

        // build number
        buildnumber: {
            options: {
                field: 'buildnum',
            },
            files: ['package.json', 'bower.json']
        }
    });


    grunt.loadNpmTasks('grunt-contrib-jshint');
    grunt.loadNpmTasks('grunt-contrib-uglify');
    grunt.loadNpmTasks('grunt-contrib-less');
    grunt.loadNpmTasks('grunt-contrib-cssmin');
    grunt.loadNpmTasks('grunt-contrib-watch');
    grunt.loadNpmTasks('grunt-ugly-folders');
    grunt.loadNpmTasks('grunt-include-source');
    grunt.loadNpmTasks('grunt-build-number');


     // this default task will go through all configuration (dev and production) in each task 
    grunt.registerTask('default', []);

    // this task will only run the dev configuration 
    grunt.registerTask('dev', ['uglyfolders','cssmin', 'includeSource', 'buildnumber']);

    // only run production configuration 
    grunt.registerTask('production', ['uglify', 'cssmin', 'includeSource', 'buildnumber']);


};


NEXT: How to use this modules with GULP, Yarn and WebPack


REST service authentication using jsonwebtoken

In my last tutorial, we have gone through REST service creation using nodeJS and MongoDB. In this tutorial we will show, how to make token based authentication using jsonwebtokenwe will use mongodb for user login information.

Lets install the jsonwebtoken module using the following command:

npm install jsonwebtoken --save

“–save” option will add this module in package.json for future installation.

Now add this module to the server.js file in the following way:

jwt = require('jsonwebtoken'),

Now lets create a user model  so that we can verify user. Create a user.js file under app/models folder and put the following contents in it:

var mongoose = require('mongoose'), 
    Schema = mongoose.Schema;

var UserSchema = new Schema({
    name : String, 
    password : String, 
    admin : Boolean
})

module.exports = mongoose.model('User', UserSchema);

Now, let’s proceed to the authentication process. Authentication consists of two steps:

  1. Login with Username and password
  2. verify the authentication before each request

To make the authentication we will create a Service called authentication.js under app/service folder and put the following code. FYI, this is modular class which will expose two methods. One for check login and another one for verify login before is each request.

var User = require('../../app/models/user'),
    jwt = require('jsonwebtoken'),
    auth = require('../../app/config/auth');

var authenticate = (function (){
    /**
     * @method checkLogin
     * @description check login with user name and password 
     */
    var checkLogin = function (username, password, response) {
        User.findOne({name : username}, function (err, user) {
            if (!user) {
                response.json({
                    success: false, 
                    message : 'Authentication failed. User not found'
                });
            } else if (user) {
                if (user.password != password) {
                    response.json({
                        success: false, 
                        message : 'Authentication failed. User/Password not found'
                    });
                } else {
                    var token = jwt.sign(user, auth.secret, {
                        expiresIn : 1440 // expires in 24 hours
                    });

                    response.json({
                        success: true,
                        message: 'Authentication Success! Enjoy your token',
                        token : token
                    });
                }
            }
        });
    };

    return {
        checkLogin : checkLogin
    };

}());

module.exports = authenticate;

To verify the login before each request, we need to have a method first. Create the following method inside the authenticate module in the following way:

.......................................................................
/**
     * @method isLoggedin
     * @description check login with user name and password 
     */
    var isLoggedin = function (request, response, next) {
        var token = request.body.token || request.query.token || request.headers['x-access-token'];

        if (request.url === '/authenticate' || request.url === '/setup') { //if try to login, avoid token check
            next();
            return false;
        }
        
        if (token) {
            jwt.verify(token, auth.secret, function (err, decoded) {
                if (err) {
                    response.json({
                        success: false,
                        message : 'Failed to authenticate token'
                    });
                } else {
                    request.decoded = decoded;
                    next();
                }
            });
        } else {
            response.json({
                success: false,
                message : 'No toekn has provided'
            });
        }
    };
.......................................................................

Now expose this method as public in the following way:

.......................................................................
return {
        checkLogin : checkLogin,
        isLoggedin : isLoggedin
    };
.......................................................................

Now we have to update route.js file. We use the following route, which will verify the login, before serving the content to that particular request URL. To do that add the following code in route.js file:

var express = require('express'),
    Bear = require('../../app/models/bear'),
    User = require('../../app/models/user'),
    jwt = require('jsonwebtoken'),
    auth = require('../../app/config/auth'),
    authService = require('../../app/service/authenticate'),
    router = express.Router();

router.use(function(req, res, next){
    console.log('Something is trying to reach at ', req.url);
    authService.isLoggedin(req, res, next);
});

// make the authentication request
router.post('/authenticate', function (req, res) {
    authService.checkLogin(req.body.name, req.body.password, res);
});

//rest of code 
.......................................................................

Now try to get list of bear from GET http://www.localhost:8080/api/bears using postman

screen-shot-2016-10-19-at-8-29-57-pm

Now it will through an error because authentication token is not available. Now Lets login or authenticate a user and get the token. Check this :

screen-shot-2016-10-19-at-8-29-10-pm

Now copy the token and put it in the GET request header like this way:

screen-shot-2016-10-19-at-8-30-33-pm

Now you will see the list of bear because Authentication token was passed as an header.

Hope you enjoy the process step by step. More will be added soon….


Create Node Server with Express & MongoDB

This tutorial will describe how to create a node server with Express Framework and MongoDB database. To start, let take a look at the prerequisite

  • NPM – node package manager
  • MongoDB

Step 01: Create a folder called “node-tutorial”. Inside the folder create a new file called “package.json”. Add the following contents to the file:

{
  "name": "node-rest-api",
  "description": "Simple REST Service implementation",
  "dependencies": {
    "body-parser": "~1.0.1",
    "express": "~4.0.0",
    "mongoose": "~3.6.13",
    }
}

now run the following command to install the dependencies:

npm install

This will create a local node_modules folder where it will install all the dependencies.

Step 02: Now create some directory in the following format. For now just create the folder, ignore the files inside the folder.

screen-shot-2016-10-15-at-8-39-30-pm

Step 03: create a node server 

Let’s create a node server. To do that, create a file in to the root folder called “server.js”. Put the following contents into file:

var express = require('express'),
    app = express(),
    bodyParser = require('body-parser');

var port = process.env.PORT || 8080;


app.use(bodyParser.urlencoded({extender: true}))
   .use(bodyParser.json())
   .listen(port);
   
console.log('Magic happens on port ', port);

Now execute the following command to run the server

node server.js

You will see the following screen in the terminal:

screen-shot-2016-10-15-at-8-45-59-pm

Congratulations, your first node server is running at port 8080.

Step 04: start mongodb server and connect from NodeJS server

First start the local mongodb Server using the following command

masud-hasan@C02RH1S1G8WM ~> mongod

2016-10-15T00:00:04.089-0400 I CONTROL [initandlisten] MongoDB starting : pid=9862 port=27017 dbpath=/data/db 64-bit host=C02RH1S1G8WM
2016-10-15T00:00:04.089-0400 I CONTROL [initandlisten] db version v3.2.5
2016-10-15T00:00:04.089-0400 I CONTROL [initandlisten] git version: 34e65e5383f7ea1726332cb175b73077ec4a1b02
2016-10-15T00:00:04.089-0400 I CONTROL [initandlisten] OpenSSL version: OpenSSL 1.0.2g 1 Mar 2016

once you run the mongodb sever, it will start on default mongo port at 27017.

Now lets connect it from our app. Create a config.js file under app/config location and put the following content into the file:

var mongoose = require('mongoose');

mongoose.connect("mongodb://localhost:27017/nodetutorial");
module.exports = mongoose;

Here we are connecting to mongodb sever using mongoose module. Here we are creating a new mongodb schema called “nodetutorial”.

To get the mongo connection available through the application, let’s include the file in the server.js file in the following way:

var express = require('express'),
    app = express(),
    bodyParser = require('body-parser');

var mongoose = require('./app/config/config.js'),
    port = process.env.PORT || 8080;


app.use(bodyParser.urlencoded({extender: true}))
   .use(bodyParser.json())
   .listen(port);
   
console.log('Magic happens on port ', port);

Now execute the following command to run the server

node server.js

if you don’t see any error then you are successfully able to connect to the mongodb server from node server.

Step 05: Verify mongodb connection with a new collection (Save & Find)

coming soon…..